Showing posts with label Sally Hansen. Show all posts

Wednesday, 12 September 2012

Challenge Day 11: Polka Dots

This mani was a super quick one, but it still turned out exactly how I wanted! I intended to post this yesterday but by the time I had taken pictures I had to jet off to work, so it had to wait until today. Darn 1-9 shifts!

Anyway, here are some polka dots!


I think this is so funky, and it literally took me 20 minutes. This look is so fun and so simple to create that anyone could do it! I started with 2 coats of Maybelline Onyx Rush which is a simple black creme, however this formula is really thin. I actually added the rest of my old generic black polish to it to thicken it up.


I then did the dots with a large dotting tool and Sally Hansen Mint Sorbet. My biggest downfall with polka dots is consistency but these ones are surprisingly even! I then used my black nail art pen to place smaller dots in the middle of the mint dots to create the circles.


So not only is this simple to create, but the colors I used were inexpensive as well! If you're a nail art newbie and you're not ready to throw yourself into expensive polishes, indie glitters and whatnot you should definitely get yourself a dotting tool or two.

Next mani is stripes! I will have some fun with this one.

Monday, 10 September 2012

Challenge Day 9: Rainbow Nails!

These were yesterday's nails, and the theme for that day was rainbow! I have done one rainbow mani before and I really loved it and enjoyed doing it but I never thought to do any other ones!

I LOVED the way this mani turned out. I just grabbed rainbow colors and went to town, my best creations always happen when I have absolutely no plan!


I started with 1 coat of Sally Hansen Whirlwind White and then a coat of Pretty & Polished Party On My Yacht. Party On My Yacht was such a perfect base to use because it almost was like a rainbow sprinkle background.


The colors I used for the rainbows were Essence Ultimate Pink, China Glaze Breakin', OPI The It Color, OPI Who The Shrek Are You?, China Glaze For Audrey & OPI Do You Lilac It?.


I just went to town starting with the pink stripe and then I added on from there. I loved the way it turned out! I was showing it off all day.

Today's challenge is gradient nails, so I better get to it!

Saturday, 8 September 2012

Challenge Day 7: Vintage Black & White With Bows!

Prepare for a double post. I started this manicure yesterday and then finished it today, so I only wore the finished manicure for half a day (That's what I get for slacking off!).

I was inspired by half vintage looks half comic book. I just wanted to do something funky & cute with a little more detail.


Isn't it so cute! It just reminds me of something along the lines of a vintage dress. I started with a base of Sally Hansen Whirlwind White. It's a good white polish for stamping, but I don't normally wear it alone on my nail. It's too chalky. However, it's a great base for bright nail art like this.


I didn't get too many great shots of this mani for some reason. They all looked great on my camera.
The polka dots were done with a dotting tool and a drugstore black polish. The bows were hand painted with a nail art brush & OPI Comet Loves Cupid.

This has been my favorite mani so far! I'm excited to get into the more challenging days!

Wednesday, 5 September 2012

Challenge Day 5: Blue feat. Pretty & Polished Beach Bum!

Today's post has to be a little quicker because I have to go to work! Also, because of my time limit, I didn't do anything too fancy today. I still wanted to make it exciting though!


This is 2 coats of Sally Hansen Pacific Blue with a coat of Pretty & Polished Beach Bum on top. Pacific Blue is an amazing, bright royal blue and is one of my favorites in my collection. It's almost a one coater, but I usually do an extra coat out of habit anyway.
Beach Bum is AMAZING, I love it so much, it is a mixture of small to large green and blue hex glitters in a clear base. You could wear this so many ways.


Then I wanted to spice up the manicure a little more! I hadn't done a crackle mani in a while, so I painted a coat of China Glaze Black Mesh on my thumb and ring finger nails.


What can I say, queen of accent nails over here! I don't think I've done a manicure without at least one accent finger since day one!


Pretty & Polished polishes can be purchased through her Etsy and also on Llarowe.

Well, I'm off to work! Sorry for the lack of detail in today's post!
My nails do look cute, though!

Tuesday, 4 September 2012

Challenge Day 4: Green feat. KBShimmer Radioactive!

I was feeling a little uninspired today, I have a terrible cold and am missing work. I was sick-free all summer, so I knew I was going to get it eventually.

Anyway, being uninspired is a great time to try out a fancy glitter indie polish! I have been lusting after KBShimmers for a while and finally got my hands on some! So of course I had to try one out.


Here's a fancy bottle shot for you all! This is KBShimmer Radioactive! It is part of the second most recent collection which was full of neons & glitter! Radioactive immediately caught my eye so I snatched it up as soon as I could.


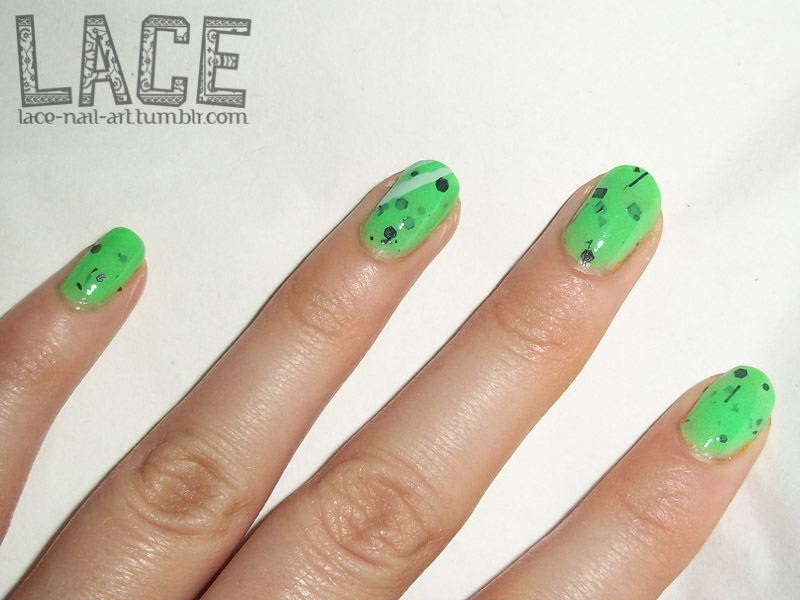
This is 3 coats of Radioactive. It is a neon highlighter-green jelly with black square, hex, bar & shard glitter suspended in the base. It is surprisingly even brighter in person. I wish I had this earlier in the summer! It also would be a neat Halloween polish if you wanted to be Frankenstein!


Of course I didn't want to leave it at that, so I added some diagonal stripes with Sally Hansen Mint Sorbet and a striper brush. I didn't realize that the one stripe on my ring finger was a little shaky until I applied topcoat, oh well!


You can purchase KBShimmer online on the website and for all my fellow Canadian ladies you can purchase it on Harlow & Co!
Radioactive is currently in stock on KBShimmer's website but not on Harlow & Co. For restock information follow KBShimmer and Harlow & Co on Facebook!

Monday, 23 July 2012

Lush Lacquer Snap Crackle Pop!

For this post I took a little break from my challenge because I couldn't resist trying out more of my Lush Lacquers!


This is Lush Lacquer Snap Crackle Pop! Obviously inspired by Rice Krispies, it is a blue jelly with blue, red and white hex & bar glitters.
I'm usually not a fan of bar glitters. No matter what I do, I can't get them to lay flat. The bar gliters in Snap Crackle Pop were actually pretty well behaved! I picked a few off that were curling up but other than that, they laid right against my nail.


I love the red/white/blue color combo. I'm not American, but I like that it's so festive! I wish I had this on the Fourth of July! This is 1 coat of Snap Crackle Pop over 2 coats of Sally Hansen Blue Me Away!. It's the perfect underwear, it's matches the blue jelly base perfectly.


Snap Crackle Pop has an awesome formula. This one coat covered this densely and I had minimal trouble over placement. I just dabbed the brush a little in bald spots and I was good to go!

I'm still wearing this mani right now. It's so much fun! I don't want to take it off!

You can purchase Lush Lacquer on Etsy in full size bottles or mini bottles like I have here. You can also visit them on Facebook!

Tuesday, 17 July 2012

Nail Art Challenge: Day 7. Black And White Nails!

This manicure was a lot of fun. You have so many options when it comes to black and white. So I didn't want to be lazy and use glitter or stamping. I wanted to do something fun, but simple.
Here's what I came up with!


A funky polka dot mani! I used Zoya Snow White for the base. This was 2 coats of the white creme polish. The application is alright, it's a little on the thick side, but then again my bottle is pretty old. It could just be time for a new one. I like Snow White because it goes on creamy, not like white out.


I wanted to add a little something, something to the dots, so I did a few random colored ones. The colors used were China Glaze Flying Dragon (Pictured. You can even see the blue glitters in the bottle shot, how cool!), China Glaze Turned Up Turquoise and Sally Hansen Blue Me Away!.


It's hard to tell Turned Up Turquoise apart from Blue Me Away in these photos. My camera flash definitely brutalized that a little bit. I saw a post about how Kayla from Nails By Kayla Shevonne has a little photography studio she DIY'd! I think I'm going to make one of those so I can take more color accurate photos sans flash. You can see her post here.

Overall I think this was a fun way to do black and white. What do you think? :)

Thursday, 12 July 2012

Nail Art Challenge: Day 5. Blue Nails!

So, as you can see, I am definitely not doing these every day. I'm definitely trying to. I've been better at actually painting them every day than posting them!
This day I was especially excited, because my new Bundle Monster set came in the mail! All of the designs are so adorable. I wanted to use all of them. So hard to decide which to use first.

Well, anyway. Here's day 5, blue nails :)


This is Sally Hansen Instadri Blue Streak. It's a gorgeous sky blue shimmer polish. It has also a frosty finish as well as a nice shimmer. The color is just, oh my god. I can't even. For all you nail art addicts on a budget, Instadri polishes are amazing for the price. This is two coats. It applies evenly and doesn't streak too much.


I then sponged my tips with China Glaze Knotty from the Anchors Away Collection. It's hard to see in this photo, the flash did not agree with me here. It's a pretty subtle effect, Knotty isn't super shear but it is shear enough just to add a little sparkle.


Here is a more accurate, no-flash photo, to show the difference of colors. I really liked how shiny and shimmery this was. I typically like cremes the best and avoid shimmers and shiny finishes other than glitter, so I wasn't sure if I'd like it, but I do!


I then stamped a design from my new Bundle Monster plates! This is an image from BM-314 stamped with Kleancolor Black. I LOVE this design. It was so fancy and funky at the same time. I was really happy with the way this image stamped too. Super clean, and it didn't smudge at all.

Have any of you purchased the new Bundle Monster plates? How did you like them?
I have to say, it was worth every penny!