This post is coming to you a little late at night, oops! I am not a morning person, so I'm always up late since I often work evenings.
Today's theme was stripes! I painted my nails before work today and just loved this mani. I have seen this simple design all over and wanted to give it a shot.
I love how long this made my nails look! The color combination is also so chic and fashionable that I looked at my nails all day long. This is something I would imagine you'd see on runway, since they are always doing effortless yet eye-catching designs.
This is 3 coats of Joe Fresh Ballet Slipper (I think that's what it's called, I'll edit this later if it isn't!) which is one of my favorite nudes because it's slightly lighter than my skin tone but still has pink undertones. One coat of this polish is perfect for french manicures on paler-skinned ladies.
The stripe was then done with a black 2-way nail art pen from ebay! Sweet, huh? I can't wait to try this with different color combinations.
Tomorrow's theme is animal print! Obviously I'll do my signature leopard print for that one, but let's see if I can spruce it up a bit!
Showing posts with label Black. Show all posts
Wednesday, 12 September 2012
Challenge Day 11: Polka Dots
This mani was a super quick one, but it still turned out exactly how I wanted! I intended to post this yesterday but by the time I had taken pictures I had to jet off to work, so it had to wait until today. Darn 1-9 shifts!
Anyway, here are some polka dots!
I think this is so funky, and it literally took me 20 minutes. This look is so fun and so simple to create that anyone could do it! I started with 2 coats of Maybelline Onyx Rush which is a simple black creme, however this formula is really thin. I actually added the rest of my old generic black polish to it to thicken it up.
I then did the dots with a large dotting tool and Sally Hansen Mint Sorbet. My biggest downfall with polka dots is consistency but these ones are surprisingly even! I then used my black nail art pen to place smaller dots in the middle of the mint dots to create the circles.
So not only is this simple to create, but the colors I used were inexpensive as well! If you're a nail art newbie and you're not ready to throw yourself into expensive polishes, indie glitters and whatnot you should definitely get yourself a dotting tool or two.
Next mani is stripes! I will have some fun with this one.
Tuesday, 4 September 2012
Challenge Day 4: Green feat. KBShimmer Radioactive!
I was feeling a little uninspired today, I have a terrible cold and am missing work. I was sick-free all summer, so I knew I was going to get it eventually.
Anyway, being uninspired is a great time to try out a fancy glitter indie polish! I have been lusting after KBShimmers for a while and finally got my hands on some! So of course I had to try one out.
Here's a fancy bottle shot for you all! This is KBShimmer Radioactive! It is part of the second most recent collection which was full of neons & glitter! Radioactive immediately caught my eye so I snatched it up as soon as I could.
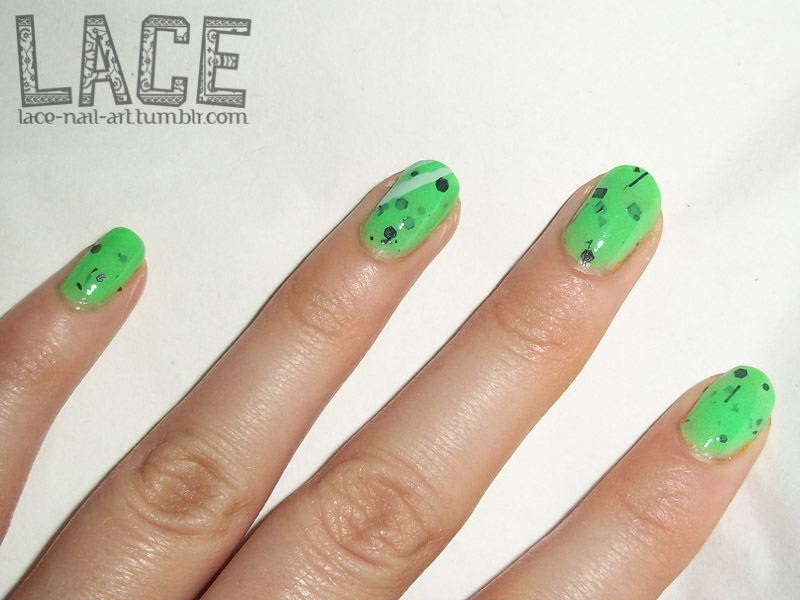
This is 3 coats of Radioactive. It is a neon highlighter-green jelly with black square, hex, bar & shard glitter suspended in the base. It is surprisingly even brighter in person. I wish I had this earlier in the summer! It also would be a neat Halloween polish if you wanted to be Frankenstein!
Of course I didn't want to leave it at that, so I added some diagonal stripes with Sally Hansen Mint Sorbet and a striper brush. I didn't realize that the one stripe on my ring finger was a little shaky until I applied topcoat, oh well!
You can purchase KBShimmer online on the website and for all my fellow Canadian ladies you can purchase it on Harlow & Co!
Radioactive is currently in stock on KBShimmer's website but not on Harlow & Co. For restock information follow KBShimmer and Harlow & Co on Facebook!
Anyway, being uninspired is a great time to try out a fancy glitter indie polish! I have been lusting after KBShimmers for a while and finally got my hands on some! So of course I had to try one out.
This is 3 coats of Radioactive. It is a neon highlighter-green jelly with black square, hex, bar & shard glitter suspended in the base. It is surprisingly even brighter in person. I wish I had this earlier in the summer! It also would be a neat Halloween polish if you wanted to be Frankenstein!
Of course I didn't want to leave it at that, so I added some diagonal stripes with Sally Hansen Mint Sorbet and a striper brush. I didn't realize that the one stripe on my ring finger was a little shaky until I applied topcoat, oh well!
You can purchase KBShimmer online on the website and for all my fellow Canadian ladies you can purchase it on Harlow & Co!
Radioactive is currently in stock on KBShimmer's website but not on Harlow & Co. For restock information follow KBShimmer and Harlow & Co on Facebook!
Labels:
31 Day Challenge,
Black,
Glitter,
Green,
Indie Polish,
KBShimmer,
Mint,
Neon,
Sally Hansen,
Stripes
Subscribe to:
Posts (Atom)