Sorry it's been so long! Suddenly work got crazy because 1, we had a black friday sale, and 2, before Christmas everyone wants their hair done. Regardless I am back and even though I haven't had time to post, I've built up lots of goodies to show you.
Today I'm gonna show you what wonders a dotting tool can create! With my Lime Crime babies (my new favorites) I did some fabulous mix n match dot stripes!
The colors I used were Lime Crime Once In A Blue Mousse, Lime Crime Pastelchio, Lime Lavendairy and a generic black creme. I think the funnest part of this manicure is the different sized dots in each stripe.
Something so simple can look so complicated and funky! Can't wait to try this in all sorts of different colors.
Lime Crime polishes can be purchased on Harlow & Co for $8.50 a bottle.
Showing posts with label Dotting Tool. Show all posts
Tuesday, 27 November 2012
Wednesday, 12 September 2012
Challenge Day 11: Polka Dots
This mani was a super quick one, but it still turned out exactly how I wanted! I intended to post this yesterday but by the time I had taken pictures I had to jet off to work, so it had to wait until today. Darn 1-9 shifts!
Anyway, here are some polka dots!
I think this is so funky, and it literally took me 20 minutes. This look is so fun and so simple to create that anyone could do it! I started with 2 coats of Maybelline Onyx Rush which is a simple black creme, however this formula is really thin. I actually added the rest of my old generic black polish to it to thicken it up.
I then did the dots with a large dotting tool and Sally Hansen Mint Sorbet. My biggest downfall with polka dots is consistency but these ones are surprisingly even! I then used my black nail art pen to place smaller dots in the middle of the mint dots to create the circles.
Anyway, here are some polka dots!
I think this is so funky, and it literally took me 20 minutes. This look is so fun and so simple to create that anyone could do it! I started with 2 coats of Maybelline Onyx Rush which is a simple black creme, however this formula is really thin. I actually added the rest of my old generic black polish to it to thicken it up.
I then did the dots with a large dotting tool and Sally Hansen Mint Sorbet. My biggest downfall with polka dots is consistency but these ones are surprisingly even! I then used my black nail art pen to place smaller dots in the middle of the mint dots to create the circles.
So not only is this simple to create, but the colors I used were inexpensive as well! If you're a nail art newbie and you're not ready to throw yourself into expensive polishes, indie glitters and whatnot you should definitely get yourself a dotting tool or two.
Next mani is stripes! I will have some fun with this one.
Saturday, 8 September 2012
Challenge Day 7: Vintage Black & White With Bows!
Prepare for a double post. I started this manicure yesterday and then finished it today, so I only wore the finished manicure for half a day (That's what I get for slacking off!).
I was inspired by half vintage looks half comic book. I just wanted to do something funky & cute with a little more detail.
Isn't it so cute! It just reminds me of something along the lines of a vintage dress. I started with a base of Sally Hansen Whirlwind White. It's a good white polish for stamping, but I don't normally wear it alone on my nail. It's too chalky. However, it's a great base for bright nail art like this.
I didn't get too many great shots of this mani for some reason. They all looked great on my camera.
The polka dots were done with a dotting tool and a drugstore black polish. The bows were hand painted with a nail art brush & OPI Comet Loves Cupid.
This has been my favorite mani so far! I'm excited to get into the more challenging days!
I was inspired by half vintage looks half comic book. I just wanted to do something funky & cute with a little more detail.
Isn't it so cute! It just reminds me of something along the lines of a vintage dress. I started with a base of Sally Hansen Whirlwind White. It's a good white polish for stamping, but I don't normally wear it alone on my nail. It's too chalky. However, it's a great base for bright nail art like this.
The polka dots were done with a dotting tool and a drugstore black polish. The bows were hand painted with a nail art brush & OPI Comet Loves Cupid.
This has been my favorite mani so far! I'm excited to get into the more challenging days!
Labels:
31 Day Challenge,
Black and White,
Bows,
Dotting Tool,
OPI,
Polka Dot,
Red,
Sally Hansen,
Vintage
Friday, 7 September 2012
Challenge Day 6: Violet Nails
So I'm actually writing this post very late at night and scheduling
it for this morning because I did it again. Painted my nails for
yesterday but then did not post them. Oops!
I did another simpler mani yesterday, as I was still sick and bed-ridden (finally better & back to work today!) But I actually love the way it turned out! The color combination reminded me of some sort of leotard a competition gymnast or figure skater might wear, ha ha!
I chose to do some big giant polka dots! (Pictured with a totally unrelated polish) The base color is 2 coats of China Glaze Flying Dragon. It is a violet neon polish that dries very fast and matte, like most other neon polishes. It also has blue & silver micro glitters, which makes this polish so interesting and one of my favorites.
The polka dots were done with OPI Glitzerland and a large dotting tool. The dotting tool was still not large enough for these dots so i sort of swirled the tool around to make the dots larger. Unfortunately, they were not perfect when done this way, but I still like them!
Sorry for the lack of photos, I did take more but I'm having issues getting my camera to take clear photos without flash. It's a newer camera, so I'll just have to play with the settings some more!
Later today comes black & white nails! I have a fun idea for this which also includes polka dots. Hopefully it will turn out awesome!
I did another simpler mani yesterday, as I was still sick and bed-ridden (finally better & back to work today!) But I actually love the way it turned out! The color combination reminded me of some sort of leotard a competition gymnast or figure skater might wear, ha ha!
I chose to do some big giant polka dots! (Pictured with a totally unrelated polish) The base color is 2 coats of China Glaze Flying Dragon. It is a violet neon polish that dries very fast and matte, like most other neon polishes. It also has blue & silver micro glitters, which makes this polish so interesting and one of my favorites.
The polka dots were done with OPI Glitzerland and a large dotting tool. The dotting tool was still not large enough for these dots so i sort of swirled the tool around to make the dots larger. Unfortunately, they were not perfect when done this way, but I still like them!
Sorry for the lack of photos, I did take more but I'm having issues getting my camera to take clear photos without flash. It's a newer camera, so I'll just have to play with the settings some more!
Later today comes black & white nails! I have a fun idea for this which also includes polka dots. Hopefully it will turn out awesome!
Labels:
31 Day Challenge,
China Glaze,
Dotting Tool,
Glitter,
OPI,
Polka Dot,
Purple,
Violet
Tuesday, 17 July 2012
Nail Art Challenge: Day 7. Black And White Nails!
This manicure was a lot of fun. You have so many options when it comes to black and white. So I didn't want to be lazy and use glitter or stamping. I wanted to do something fun, but simple.
Here's what I came up with!
A funky polka dot mani! I used Zoya Snow White for the base. This was 2 coats of the white creme polish. The application is alright, it's a little on the thick side, but then again my bottle is pretty old. It could just be time for a new one. I like Snow White because it goes on creamy, not like white out.
I wanted to add a little something, something to the dots, so I did a few random colored ones. The colors used were China Glaze Flying Dragon (Pictured. You can even see the blue glitters in the bottle shot, how cool!), China Glaze Turned Up Turquoise and Sally Hansen Blue Me Away!.
It's hard to tell Turned Up Turquoise apart from Blue Me Away in these photos. My camera flash definitely brutalized that a little bit. I saw a post about how Kayla from Nails By Kayla Shevonne has a little photography studio she DIY'd! I think I'm going to make one of those so I can take more color accurate photos sans flash. You can see her post here.
Overall I think this was a fun way to do black and white. What do you think? :)
Here's what I came up with!
A funky polka dot mani! I used Zoya Snow White for the base. This was 2 coats of the white creme polish. The application is alright, it's a little on the thick side, but then again my bottle is pretty old. It could just be time for a new one. I like Snow White because it goes on creamy, not like white out.
I wanted to add a little something, something to the dots, so I did a few random colored ones. The colors used were China Glaze Flying Dragon (Pictured. You can even see the blue glitters in the bottle shot, how cool!), China Glaze Turned Up Turquoise and Sally Hansen Blue Me Away!.
It's hard to tell Turned Up Turquoise apart from Blue Me Away in these photos. My camera flash definitely brutalized that a little bit. I saw a post about how Kayla from Nails By Kayla Shevonne has a little photography studio she DIY'd! I think I'm going to make one of those so I can take more color accurate photos sans flash. You can see her post here.
Overall I think this was a fun way to do black and white. What do you think? :)
Monday, 11 June 2012
Inspiration Monday: Bright Flowers
I wanted to start a weekly tradition for myself to keep me inspired, and I kept searching for what people were doing for their weekly challenges. Then I thought to myself, what if I do a weekly inspired mani? Inspired by a photo, pattern, tv show, jewelry, anything! So here is my first Inspiration Monday! What a good way to make mondays better.
This week's mani is inspired by my iPhone background. I have this little app that I can download background off, and all the ones I download are always floral. Because I'm obsessed with floral.
Here is my inspiration photo. Pretty, huh? So bright and cheery.
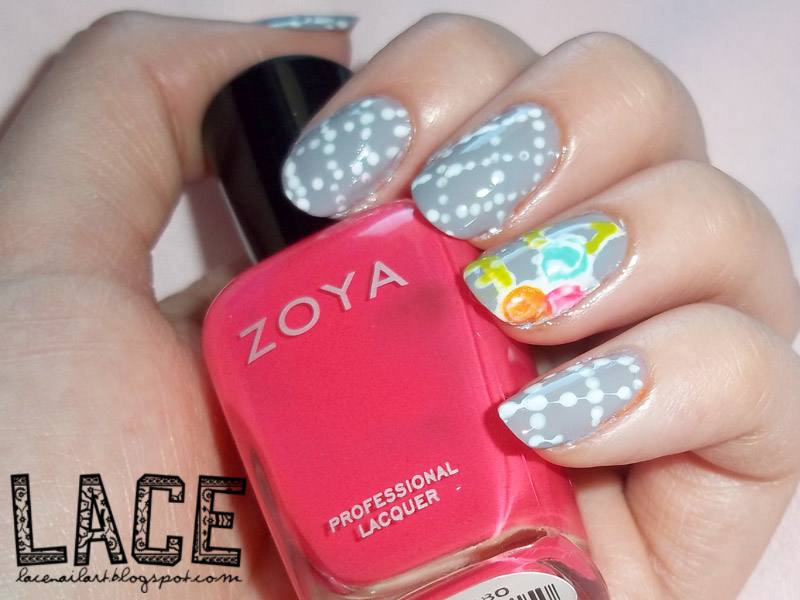
And here is my inspiration mani! The base color is Joe Fresh Cement, which is an awesome medium grey jelly that paints wonderfully. I did the lines with a white NYC polish (it has no name). The reason I dotted the lines is because they are so subtle in the photo and there's no way I could've got them thin enough to look the same. I like the way they look dotted.
I did the flower accent nail by first painting a white background for them like in the picture. Then I put a blob of Zoya ReneƩ for the pink flower, China Glaze Breakin' for the orange flower and China Glaze For Audrey for the blue flower. I made them look a little more like flowers by swirling a little white on top of them. The vines were done with OPI Who The Shrek Are You? and a dotting tool.
What do you guys think about this mani? And would any of you like to partake in Inspiration Monday? Leave a comment and let me know :)
Labels:
China Glaze,
Dotting Tool,
Flowers,
Grey,
Inspiration,
Joe Fresh,
OPI,
Zoya
Subscribe to:
Posts (Atom)